In WLC 4.2, there is only a field for the name of the Primary, Secondary and tertiary controller. If the AP only learns about one WLC during discovery, it can use these names for other WLC's, but as there is no IP address to be configured here, the WLC uses mobility group information to establish the IP.
Now, if the WLC's are in different mobilty groups. There is no way to provide this information via the GUI. A CLI command is required.
config ap primary-base WLC1 AP1 10.10.10.10
config ap secondary-base WLC2 AP1 10.10.10.11
An AP reboot will probably be required!
Monday, 28 February 2011
Thursday, 24 February 2011
Best Practice Settings for 7921G Phone
General Recommendations
Set DTIM to 2
Beacon Period 100 ms
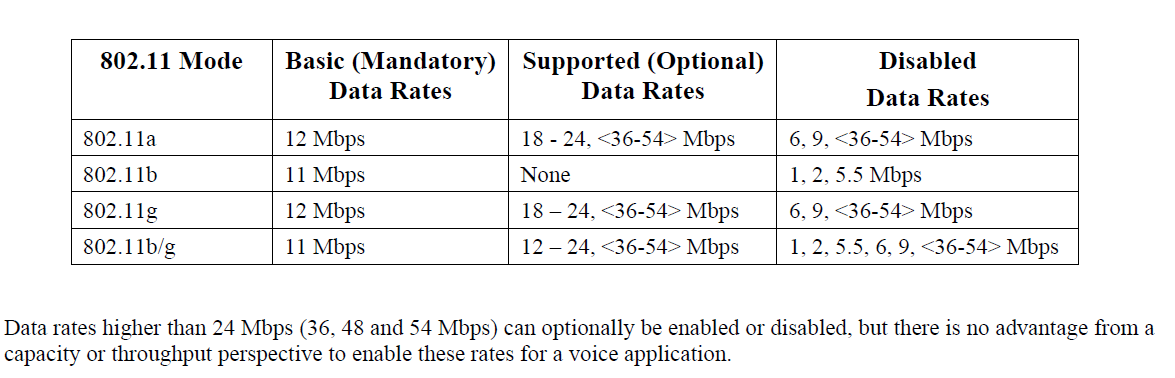
Data Rates

Multicast traffic will be sent at the highest basic data rate enabled on the access point, so will want to ensure that only the lowest enabled rate is configured as the only basic rate.
Broadcast traffic is sent at the lowest basic rate.
Autonomous Recommendations
Power no greater that 17dbm for 2.4GHz
Power no greater than 16dbm for 5GHz
Ensure the client uses the same power
power local x
power client local
enable wmm on the interface
enable arp-caching
dot11 arp-cache
For the Cisco Autonomous Access Point, "dot11 phone" or "dot11 phone dot11e" will enable QBSS."Dot11 phone"
It is recommended to enable
TSPEC
configure values in the GUI for CAC
remenber to set-up admit-traffic on the SSID
admit-traffic
enable AVVID cos mappings
The documentation (7921G deployment guide) states setting up a QoS policy to set UP values based on DSCP, however this would not come into play if Layer 2 markings are already specified.
Enable world mode to ensure non US phone obeys local regulatory restrictions
world-mode dot11d country US bothwill enable the 2 Cisco versions, where "dot11 phone dot11e" will enable both CCA versions (802.11e and Cisco version 2). "dot11 phone dot11e".Configure both "open with eap" and "network eap" for authentication
Unified Recommendations
DTIM 2 beacon period 100 ms
Disable Session timeout or increase
Disable client exclusion
Enable Aironet IE
Enable DTPC
Disable P2P Blocking
Enable DHCP Address Assignment
MFP Disabled or Optional
Enable CAC and Load Based CAC
Disable Low Latency Mac (as the phone has a dynamic buffer)
Platinum QoS Profile with dot1p set to 6
WMM Allowed or Required
Disable Aggressive load balancing
Enable Symetric Tunneling Mode
Enable Short Preamble for 802.11g
Enable CCX location measurement
config advanced eap request-timeout 30config network arpunicast disable
Remove channel 165 from the DCA list as the phone does not support it
Recommend to disable UNII-II extended when using UNII-3 for a 12 channel model
DFS(802.11h)
Power constraint should be left un-configured or set to 0 dBm as DTPC will be used by the Cisco Unified Wireless IP Phone7921G to control the transmission power.
For the Cisco Unified Wireless LAN Controller, enabling WMM will enable the 802.11e version of QBSS. There are also the"7920 Client CAC" and "7920 AP CAC" options, where "7920 Client CAC" will enable Cisco version 1 and "7920 APCAC" enables Cisco version 2.
Enable Traffic Stream Metrics
The CAC voice stream-size and voice max-streams values can be adjusted as necessary by using the following command.
config 802.11a cac voice stream-size 84000 max-streams 2
Restoring Factory DefaultsThe configuration can be cleared by using the factory default menu option on the phone.
The factory default option erases all user-defined entries in Network Profiles, Phone Settings, and Call History.
To erase the local configuration, follow these steps:
1. Choose Settings > Phone Settings.
2. Press
The phone briefly displays "**2" on the keypad."Restore to Default?"3. Press the
The phone resets after selecting "Yes" softkey to confirm or "No" to cancel.(it is by default, this enables proxy arp)
Set DTIM to 2
Beacon Period 100 ms
Data Rates
Multicast traffic will be sent at the highest basic data rate enabled on the access point, so will want to ensure that only the lowest enabled rate is configured as the only basic rate.
Broadcast traffic is sent at the lowest basic rate.
Autonomous Recommendations
Power no greater that 17dbm for 2.4GHz
Power no greater than 16dbm for 5GHz
Ensure the client uses the same power
power local x
power client local
enable wmm on the interface
enable arp-caching
dot11 arp-cache
For the Cisco Autonomous Access Point, "dot11 phone" or "dot11 phone dot11e" will enable QBSS."Dot11 phone"
It is recommended to enable
TSPEC
configure values in the GUI for CAC
remenber to set-up admit-traffic on the SSID
admit-traffic
enable AVVID cos mappings
The documentation (7921G deployment guide) states setting up a QoS policy to set UP values based on DSCP, however this would not come into play if Layer 2 markings are already specified.
Enable world mode to ensure non US phone obeys local regulatory restrictions
world-mode dot11d country US bothwill enable the 2 Cisco versions, where "dot11 phone dot11e" will enable both CCA versions (802.11e and Cisco version 2). "dot11 phone dot11e".Configure both "open with eap" and "network eap" for authentication
Unified Recommendations
DTIM 2 beacon period 100 ms
Disable Session timeout or increase
Disable client exclusion
Enable Aironet IE
Enable DTPC
Disable P2P Blocking
Enable DHCP Address Assignment
MFP Disabled or Optional
Enable CAC and Load Based CAC
Disable Low Latency Mac (as the phone has a dynamic buffer)
Platinum QoS Profile with dot1p set to 6
WMM Allowed or Required
Disable Aggressive load balancing
Enable Symetric Tunneling Mode
Enable Short Preamble for 802.11g
Enable CCX location measurement
config advanced eap request-timeout 30config network arpunicast disable
Remove channel 165 from the DCA list as the phone does not support it
Recommend to disable UNII-II extended when using UNII-3 for a 12 channel model
DFS(802.11h)
Power constraint should be left un-configured or set to 0 dBm as DTPC will be used by the Cisco Unified Wireless IP Phone7921G to control the transmission power.
For the Cisco Unified Wireless LAN Controller, enabling WMM will enable the 802.11e version of QBSS. There are also the"7920 Client CAC" and "7920 AP CAC" options, where "7920 Client CAC" will enable Cisco version 1 and "7920 APCAC" enables Cisco version 2.
Enable Traffic Stream Metrics
The CAC voice stream-size and voice max-streams values can be adjusted as necessary by using the following command.
config 802.11a cac voice stream-size 84000 max-streams 2
Restoring Factory DefaultsThe configuration can be cleared by using the factory default menu option on the phone.
The factory default option erases all user-defined entries in Network Profiles, Phone Settings, and Call History.
To erase the local configuration, follow these steps:
1. Choose Settings > Phone Settings.
2. Press
The phone briefly displays "**2" on the keypad."Restore to Default?"3. Press the
The phone resets after selecting "Yes" softkey to confirm or "No" to cancel.(it is by default, this enables proxy arp)
Use AutoQos (without using AutoQos!) and without a reboot!
Its well known that this can be done by running Autoqos, copying into notepad and rebooting the switch. But this takes precious time, especially with the 6500.....So
cut and paste what you need from the config
copy running flash:old.cfg
run the autoqos commands
cut and paste what you need from the config
config replace flash:old.cfg
then you have the auto-qos best practice parameters and can copy them to your interface from notepad and you didn't configure the working config with auto-qos command.
Wednesday, 23 February 2011
TACACS+ WLC User Authentication
Use this process to configure the WLC for Tacacs
Add a TACACS Authentication server
Add a TACACS Authorisation server (also required)
Go to ACS add NAS
Go to interface config and add PPP SHELL and ADVANCED TACACS (for user also if required)
Add ciscowlc and common under new services
Select these attributes in either user or group and add the required roles for access
role1=ALL (full admin rights)
role1=WIRELESS
role2=WLANS (for specific WLC tab access)
roleX=X
role1=MONITOR (read only rights)
WLC Syslog Levels
This caught me out when going through the IPX workbook and I also had a similar issue at the Fastlane bootcamp.
If they ask you in the lab to configure a specific log level, its not clear in the GUI what level it is as they are not in level order. So I thought, check the 4.2 config guide. ITS WRONG. The 5.0 config guide has the correct information! Learn if you can, but if you forget, remember to check the 5.0 Guide for reference!
To set the severity level for filtering syslog messages to the syslog servers, choose one of the following options from the Syslog Level drop-down box:
• Emergencies = Severity level 0
•Alerts = Severity level 1 (default value)
•Critical = Severity level 2
•Errors = Severity level 3
•Warnings = Severity level 4
•Notifications = Severity level 5
•Informational = Severity level 6
•Debugging = Severity level 7
Tuesday, 22 February 2011
WLC CLI Commands Only - Work in progress
Commands that are only available in the CLI
config advanced eap request-timeout 20
config advanced eap identity-request-timeout 20
Generally considered best practice to configure these. The phone is slow and can time out the request if the default is set to 1.
config network secureweb cipher-option high enable
Changes level of encryption on HTTPS GUI
config network arp unicast enable
Turns on proxy arp. The controller will provide its own mac to clients requesting a mac not in its database. It will then make the request on behalf of the client.
config advanced dot11-padding enable
Pads proxy arp responses to 60 bytes. Some non Cisco clients can have an issue with arp responses that are below this level.
config advanced 802.11a logging txpower on
Example, can be used for both radios and different logging metods for the AP's.
config advanced client-handoff x
Used to inform CCX clients of the amount of excessive retries required before a roam is forced.
config mobility secure-mode enable
Configures secure mobility on port 16667. All members of mobility group need it. Not supported in 2100's
config wlan security tkip hold-down 0 [wlan id]
This is used to stop the 60 second counter measure when 2 TKIP MIC errors are detected on an SSID.
Configuring WLC Interfaces in Notepad
It can take all year to set up interfaces that span multiple controllers via the GUI. A good trick is to do this in Notepad and just change the values for each interface, once they are built for a single controller, just chance the IP address and paste to the others! If you cant remember the commands do one interface in CLI using Tab, if you cant do it using Tab, learn!
Also, only use lower case for inteface names, if you use upper case, they will show in GUI as lower case, but not map to WLAN's correctly!
config interface create guest 11
config interface address dynamic-interface guest 10.10.11.15 255.255.255.0 10.10.11.1
config interface dhcp dynamic-interface guest primary 10.10.210.6
config interface port guest 1
Cisco Unified Wireless Network Ports
Cisco Unified Wireless Network Ports
LWAPP Data Packets: UDP 12222 to the WLC (AP uses ephemeral ports)
LWAPP Control Messages: UDP 12223 to the WLC
CAPWAP Control: UDP 5246
CAPWAP Data: UDP 5247
WCP for WiSM: UDP 10000
Mobility Control Messages: UDP 16666 and/or UDP 16667 (secure-mode)
Mobility EoIP Tunnel: IP Protocol 97
Use mping for mobility control verifcation and eping for mobility data verification
RRM Messages 802.11b/g Client: UDP 12124
RRM Messages 802.11b/g Server: UDP 12134
RRM Messages 802.11a Client: UDP 12125
RRM Messages 802.11a Server: UDP 12135
Radius Authentication: UDP 1812
Radius Accounting: UDP 1813
Radius Authentication (legacy): UDP 1645
Radius Accounting (legacy): UDP 1646
TACACS+: TCP 49
DHCPv4 Clients: UDP 68
DHCPv4 Server: UDP 67
DHCPv6 Clients: TCP/UDP 546
DHCPv6 Server: TCP/UDP 547
HTTPS: TCP 443
HTTP: TCP 80
Telnet: TCP 23
SSH: TCP 22
TFTP: UDP 69
SNMP: UDP 161 and UDP 162
Syslog: UDP 514
NTP: UDP 123
Monday, 21 February 2011
Configuring Multicast using Auto-RP
Enable multicast routing globally
ip multicast-routing distributed
Enable pim-sparse mode on all interfaces required to receive the stream including SVI's and Loopbacks
ip pim sparse-mode
Then configure both switches as RP's if required
configure pim auto listener so that the RP disovery messages can be sent out using dense mode
ip pim autorp listener
Configure both RP's to announce themsleves as the RPip pim send-rp-announce Loopback0 scope 10
Also set them up as the mapping agents for Auto-RPip pim send-rp-discovery Loopback0 scope 10
Clearing LWAPP configs
Thanks to Jason Boyers for this great info on clearing those annoying configs!
One issue I’ve run into both in studying for the ccie wireless lab, and now in developing training material, is how to completely clear the configuration on a lightweight AP. In the “old” days, you would write erase the IOS configuration, reboot, and BAM – you had a clean slate to work from. However, the pesky LAPs keep the IP addresses of previously joined WLCs and other WLCs in the same mobility group in NVRAM. So, what do you do? There is that command, clear ap-config AP_Name that you can run from the CLI of the WLC, if it’s joined to a WLC.
And, that will clear the configuration in NVRAM. You can verify that with the “show lwapp client config command. The first is the before, and the second is the after (after it has rebooted).
And, then, after the command is run
So, now, you have a clean config. Or, mostly clean. You can use various methods to have the AP discover a WLC (DNS, DHCP, broadcast), but you still cannot statically define information from the CLI. Go ahead. Try lwapp ap controller ip address x.x.x.x or clear lwapp private-config. You will get the infamous ERROR!!! Command is disabled. error message.
But, wasn’t the configuration cleared??? Mostly yes. However, the image file used to boot the AP after the config was cleared is the full LWAPP image that it was last using. It uses the information in the flash:env_vars file in order to boot using that information.
The other pieces should look familiar as well, to those who have used the local TFTP method of converting from LWAPP to IOS. Because of using a full LWAPP image, the AP knows that at one point it was joined to a WLC. If it was joined to a WLC, then the lwapp commands shouldn’t be used.
So, how do we get around this? The simplest way I have found is to treat the AP as if you were going to do a local TFTP upgrade, but without the TFTP server. If you power down the AP and then hold the Mode button until it turns red (about 20 seconds), the AP will boot up. If you look at the console, you will see the following:
Looks like a TFTP upgrade. Then, when the TFTP transfer times out, the AP gives an error message %Error opening long_file_name. After this, it shows:
Ah, the recovery image! After the AP boots, the flash:env_vars file no longer has that BOOT line.
Now, when we try the lwapp commands, they will be accepted. This is because it is the recovery image, not the full image. Let’s see what happens:
So, the lwapp command was accepted, and now we can statically define the WLC for it to discover. While you probably won’t have to do this on the lab (though, who knows!) hopefully it can be useful in the field or in your home lab.
One issue I’ve run into both in studying for the ccie wireless lab, and now in developing training material, is how to completely clear the configuration on a lightweight AP. In the “old” days, you would write erase the IOS configuration, reboot, and BAM – you had a clean slate to work from. However, the pesky LAPs keep the IP addresses of previously joined WLCs and other WLCs in the same mobility group in NVRAM. So, what do you do? There is that command, clear ap-config AP_Name that you can run from the CLI of the WLC, if it’s joined to a WLC.
(Cisco Controller) >clear ap-config LWAP1
clear ap-config will clear ap config and reboot the AP, Are you sure you want continue? (y/n) y

All AP configuration including AP's static IP configuration has been cleared.
LWAP1#show lwapp client config
... (lines removed for ease of explanation)
name                    LWAP1
mwarName                WLC1
mwarName WLC2AP001d.a1ec.11cc#show lwapp client config
AP001d.a1ec.11cc#AP001d.a1ec.11cc#lwapp ap controller ip address 10.10.111.20
ERROR!!! Command is disabled.AP001d.a1ec.11cc#more flash:env_vars
BOOT=flash:/c1130-k9w8-mx.124-10b.JDD/c1130-k9w8-mx.124-10b.JDD
DEFAULT_ROUTER=10.0.0.1
ENABLE_BREAK=no
IP_ADDR=10.0.0.1
MANUAL_BOOT=no
NETMASK=255.255.255.224
RELOAD_REASON=9
TERMLINES=0So, how do we get around this? The simplest way I have found is to treat the AP as if you were going to do a local TFTP upgrade, but without the TFTP server. If you power down the AP and then hold the Mode button until it turns red (about 20 seconds), the AP will boot up. If you look at the console, you will see the following:
button pressed for 20 seconds
process_config_recovery: set IP address and config to default 10.0.0.1
process_config_recovery: image recovery
image_recovery: Download default IOS tar image tftp://255.255.255.255/c1130-k9w7-tar.default
Loading "flash:/c1130-rcvk9w8-mx/c1130-rcvk9w8-mx"...###############################[...]

File "flash:/c1130-rcvk9w8-mx/c1130-rcvk9w8-mx" uncompressed and installed, entry point: 0x3000
executing...
AP001d.a1ec.11cc#more flash:env_vars
DEFAULT_ROUTER=10.0.0.1
ENABLE_BREAK=no
IP_ADDR=10.0.0.1
MANUAL_BOOT=no
NETMASK=255.255.255.224
RELOAD_REASON=9
TERMLINES=0AP001d.a1ec.11cc#lwapp ap controller ip address 10.10.111.20
AP001d.a1ec.11cc#
examining image...
Loading file /c1130...
!
extracting info (292 bytes)
Image info:
Version Suffix: k9w8-.124-10b.JDD
Image Name: c1130-k9w8-mx.124-10b.JDD
Version Directory: c1130-k9w8-mx.124-10b.JDD
Ios Image Size: 3645952
Total Image Size: 3645952
Image Feature: WIRELESS LAN|LWAPP
Image Family: C1130
Wireless Switch Management Version: 4.2.207.0
Extracting files...
c1130-k9w8-mx.124-10b.JDD/ (directory) 0 (bytes)
extracting c1130-k9w8-mx.124-10b.JDD/c1130-k9w8-mx.124-10b.JDD (3374566 bytes)
*Mar 1 0!0:08:23.897: %LWAPP-5-CHANGED: LWAPP changed state to JOIN
*Dec 2 23:38:41.161: %LWAPP-5-CHANGED: LWAPP changed state to IMAGE!!Thursday, 17 February 2011
VTP Modes
Use Version 2 when a transparent mode switch needs to send received updates out of its trunks.
VTP Modes
You can configure a switch to operate in any one of these VTP modes:- Server—In VTP server mode, you can create, modify, and delete VLANs and specify other configuration parameters, such as VTP version and VTP pruning, for the entire VTP domain. VTP servers advertise their VLAN configuration to other switches in the same VTP domain and synchronize their VLAN configuration with other switches based on advertisements received over trunk links. VTP server is the default mode.
- Client—VTP clients behave the same way as VTP servers, but you cannot create, change, or delete VLANs on a VTP client.
- Transparent—VTP transparent switches do not participate in VTP. A VTP transparent switch does not advertise its VLAN configuration and does not synchronize its VLAN configuration based on received advertisements, but transparent switches do forward VTP advertisements that they receive out their trunk ports in VTP Version 2.
- Off (configurable only in CatOS switches)—In the three described modes, VTP advertisements are received and transmitted as soon as the switch enters the management domain state. In the VTP off mode, switches behave the same as in VTP transparent mode with the exception that VTP advertisements are not forwarded.
Thursday, 10 February 2011
Autonomous QoS
If a CoS Value comes into the AP, that takes priority over all other QoS policies.
Then the dot11 phone setting is used to "identify" a phone and provide priority.
Then QoS policies are looked at.
For QBSS Draft 6 supported by the 7920, QoS Element for Wireless Phones to enable (no dot11e)
dot11 phone
For QBSS Draft 12 IEE802.11e supported by the 7921 also tick dot11e
dot11 phone dot11e
Enable WMM for the Vendor specific que values to be offered in the beacons (per radio) does not hurt to leave on in most cases unless they ask you to remove it
default
Enable Low latency where needed so that packets are dropped after certain level of discard. Not for 7921 due to its dynamic queing mechanism.
When optimising for 7921 phones, design guides state to match RTP and SCCP by DSCP and map to relevent cos (possibly not needed but hey!)
class-map match-all _class_RTP0
match ip dscp ef
class-map match-all _class_RTP1
match ip dscp cs3
policy-map RTP
class _class_RTP0
set cos 6
class _class_RTP1
set cos 4
interface Dot11Radio0.13
service-policy input RTP
service-policy output RTP
Also when optimising. Select Optimized for voice, but remove low latency queing from Stream as 7921 dont need it!
Wednesday, 9 February 2011
WDS and CCKM
A breakdown of the configuration required for WDS and a CCKM ssid. Scenario requires EAP-FAST for the WDS auth and LEAP for the client auth.
aaa authentication login eap_methods group rad_eap
(set up the auth method, can be the same as the client auth)
aaa group server radius rad_eap
server 10.10.110.103 auth-port 1812 acct-port 1813
(configure a radius group for local or ACS)
radius-server host 10.10.110.103 auth-port 1812 acct-port 1813 key 7 020F145E13160A3358
(define the radius server and key)
radius-server local
eapfast server-key primary auto
nas 10.10.110.103 key xxx
(nas only required on WDS AP, other AP's in the domain use WLCCP for client auth)
user wds pass xxx
(user for infrastructure auth)
user leap pass xxx
(user for client auth)
eap profile FAST
method fast
wlccp ap username wds password xxx
(to join the AP to the WDS, also needs to be done on domain AP's)
wlccp ap eap profile FAST
(this is required to specify EAP-FAST as the infrastructure auth type, if not LEAP is used!)wlccp authentication-server infrastructure eap_methods
(specifies the infrastructure auth method)wlccp authentication-server client leap eap_methods
(specifies client auth method) ssid Test5
wlccp wds recovery rate 10
(allows only 10 authentications per second during failover to prevent DoS)wlccp wds priority 255 interface BVI1
(enables WDS on this AP and configures priority, 255 is the highest and will be WDS)
dot11 ssid Test5
vlan 15
authentication network-eap eap_methods
(open eap not required as LEAP only) authentication key-management cckm
(enable CCKM fast roaming for the SSID)
interface Dot11Radio0
encryption vlan 15 mode ciphers ckip-cmic
(enable ckip Cisco proprietary encryption with cmic to check integrity)
dot11 extension aironet
(this must be enabled with ckip and cmic, it should be by default)
Tuesday, 8 February 2011
Tacacs Authentication and Authorization
A breakdown of what is required for tacacs user auth on an AAP.
aaa new-model
aaa authentication login LOGIN group tac_users local
aaa authentication enable default group tac_users enable
aaa authorization exec LOGIN group tac_users local
(used LOGIN in this case as there was a requirement to use non default auth list)
aaa group server tacacs+ tac_users server 10.10.210.5
tacacs-server host 10.10.210.5 key 7 08285C4B1109000506
ip http authentication aaa login-authentication LOGINip http authentication aaa exec-authorization LOGIN
(define HTTP authentication lists)
line vty 0 4
authorization exec LOGIN login authentication LOGIN transport input ssh
(define VTY line attributes)
ACS
Configure NAS
Interface Configuration - Advanced options
Select user options if required
Edit TACACS+,add shell and advanced options
Under User or Group, Set Max privilege to 15, Use Ciscosecure PAP password under enable
Set per user command auth
Permit unmatched in no specific commands required
Network EAP v Open with EAP
Thanks to Jerome Henry for this excellent explanation......
Autonomous APs: Network EAP vs. Open with EAP, the right combination

On the CLI, you would say:
dot11 ssid whatever
authentication open eap eap_methods
authentication network-eap eap_methods
As Cisco documentation (for example here) is... er... not completely clear (thanks Seth for pointing me to it!), if not completely wrong, here is a quick summary of which one to choose and when.
First, background information on why this is here (skip this part if you don't care about the whys and just care about the hows).
All this started at the time when we had "nothing (Authentication set to 0 in the AP beacons)" or WEP PSK (Authentication set to 1 in the AP beacons). WEP was weak, so everybody needed a replacement for it. Cisco implemented LEAP, which implies both au authenticaion mechainsm and some encryption. So Cisco set the Authentication value to 1 in the AP beacons using LEAP, not to indicate PSK but to indicate "authentication required" (and this is also why you cannot use LEAP with no encryption). But this does not really conform to the (future, when LEAP was created) 802.11i (and WPA) specifications, so this is Cisco specific...
Later on, when WPA and 802.11i appeared, the protocol detailed that, for compatibility with the 802.1X protocol, the authentication would occur at the association phase. In other words, with 802.1X you plug your PC to a switch, and it is only when you do that that authentication occurs. Similarly in the wireless space, you go through the 802.11 authentication phase (request/response) in an open manner, and it is only when you go to the association phase, which is the "hey, plug me to your cell" message, that the AP says "wait, I need to do 802.1X authentication first", and the EAP process starts. So, Authentication is set to 0 (for its 802.11 part), and EAP/802.1X starts at the association phase.
At the same time, in 2004, ASLEAP was released, and so was 802.11i, following WPA the year before. So when Cisco replaced LEAP with EAP-FAST, the information I have is that they conformed to the WPA/802.11i specifications, and Authentication is set to 0.
So, (whatever the documentation above says) Network EAP = LEAP. Open with EAP = Any other EAP. This is something you see when checking Network EAP: the popup window clearly states that if you use EAP-FAST or any other EAP (than LEAP), you should check Open with EAP. You can of course check both when you want to allow LEAP and another EAP, but you will not be able to authenticate using EAP-FAST if you choose Network EAP only...
There is one exception though... for long, LEAP used to be the default "secure" authentication method. This makes that some old Cisco clients (for example access points!) need to be offered LEAP to get started (or turned on, name it the way you like)!
In other words, if you build a wireless link between 2 APs, for a repeater, bridge or Workgroup Bridge configuration, and if you use 802.1X on that link, you need to offer LEAP (i.e Network EAP) for the secure authentication to be used. So you can offer Network EAP, or Network EAP and Open with EAP, but you should not offer just Open with EAP.
Which one is going to be used if you offer both? Well, it all depends on how you configure your client side (non root Bridge, Workgroup Bridge, etc). If you use the "old" EAP Client (optional feature), in the SSID page:

Which is in the CLI:
dot11 ssid whatever
authentication client username jerome password 7 104D000A0618
This is going to use LEAP only.
If you want to use another EAP, for example EAP-FAST, you need to empty that EAP Client field (it cannot be used in combination with another method), then use the AP Authentication feature.

In this page, you define credentials and method. You can pick up several methods if you want.
Then from the SSID page, you can call these methods:

In the CLI, this is:
dot11 ssid whatever
dot1x credentials jerome
dot1x eap profile Myfast
exit
eap profile Myfast
method fast
dot1x credentials jerome
username cisco
password cisco
So you offer both LEAP and Open with EAP, and using the newer AP Authentication method allows you to to use the credentials you defined, and use the most secure method selected. In this example, we use EAP FAST only, so that's the one we'll use. Of course, the RADIUS to which you main AP points (local RADIUS on the main APor external RADIUS) needs to allow that method.
Careful when testing, it is only from the non-root AP / WGB / repeater CLI that you will use, at authentication time, which method was used. The main AP CLI will just tell you "WPA", or "Open", etc., but not the details of the authentication method used.
If you offer just Open with EAP, as the AP expects LEAP (Network LEAP) among the possibilities, then the EAP part is discarded. Although your link may come up, if you look carefully at your non-root AP CLI, you will see that the authentication is going to be "Open" (NOT with EAP), so there is no real authentication there. As soon as you also offer Network EAP, the non-root AP is happy, being offered LEAP, btu also something stronger, and is going to use the stronger method (EAP-FAST in our example)>
Give it a try in your lab!
;-)
Monday, 7 February 2011
short-slot-time
short-slot-time (default)
Use to enhance 802.11g performance
Use the short-slot-time configuration interface command to enable short slot time on the 802.11g, 2.4-GHz radio. Short slot time reduces the slot time from 20 microseconds to 9 microseconds, thereby increasing throughput. The access point uses short slot time only when all clients that are associated to the 802.11g radio can support short slot time.
short-slot-time

Note  This command is supported only on 802.11g, 2.4-GHz radios.
Syntax Description
This command has no arguments or keywords.
Defaults
Short slot time is disabled by default.
Command Modes
Configuration interface
Command History
Examples
This example shows how to enable short slot time:
AP(config-if)# short-slot-time
dot11 extension aironet
dot11 extension aironet
There are several additional attributes provided with AE. Can be disabled sometimes for legacy clients to connect.
Use the dot11 extension aironet configuration interface command to enable or disable Cisco Aironet extensions to the IEEE 802.11b standard. Use the no form of this command to disable the Cisco Aironet extensions.
[no] dot11 extension aironet
Note You cannot disable Cisco Aironet extensions on bridges.
Syntax Description
This command has no arguments or keywords.
Defaults
Cisco Aironet extensions are enabled by default.
Command Modes
Configuration interface
Command History
Usage Guidelines
The Cisco Aironet extensions help clients choose the best access point. You must enable these extensions to use advanced features such as Cisco MIC and key hashing. Disable these extensions for non-Cisco clients that misinterpret the extensions.
Examples
This example shows how to enable Cisco Aironet extensions for the radio interface:
AP(config-if)# dot11 extension aironet
This example shows how to disable Cisco Aironet extensions for the radio interface:
AP(config-if)# no dot11 extension aironetWhat are the features supported by the Aironet Extension option?
A. The Aironet extension is a proprietary feature implemented by Cisco. Aironet extensions contains information elements that support these features.
Devices that are CCX compatible also can take advantage of some of the Aironet Extension features. Here is a list of the features available with the different versions of Cisco Compatible Extensions:
- Load Balancing: The access point uses Aironet extensions to direct client devices to an access point that provides the best connection to the network based on factors such as the number of users, bit error rates, load and signal strength.
Load balancing is proprietary between devices that understand the Aironet extensions. Load balancing is implemented by extensions in AP beacons and/or probe-responses, which provide information on these:
The client evaluates these and associates to the "best" one. Non-Cisco clients do not understand these extensions.
- Base-station signal strength
- Base station loading (% transmitter busy)
- Number of hops to the backbone
- Number of client associations
- MIC: Cisco Proprietary Message Integrity Check (MIC) — MIC is an additional WEP security feature that prevents attacks on encrypted packets called bit-flip attacks. The MIC is implemented on both the access point and all associated client devices.
- Cisco Proprietary Temporal Key Integrity Protocol (CKIP), also known as WEP key hashing, is an additional WEP security feature that defends against an attack on WEP, in which the intruder uses an unencrypted segment called the initialization vector (IV) in encrypted packets to calculate the WEP key.
- In addition to these, Aironet extensions carry more information that include these:
- Load that the AP currently handles
- Number of hops from the Wired network
- Device type, which helps identify the product under the Cisco system for management
- Device name
- Number of associated clients
- Radio type, a feature used to determine certain characteristics about the radio, such as datarate, radio type (1310, 1200, 352 or 342), security type (WEP/802.1x), etc.
Cisco Compatible Extensions - Versions and Features
preamble-short
preamble-short (default)
Can be used to improve the performance of 802.11g clients capable of supporting short preambles and less overhead.
Use the preamble-short configuration interface command to enable short radio preambles. The radio preamble is a selection of data at the head of a packet that contains information that the access point and client devices need when sending and receiving packets. Use the no form of the command to change back to default values.
[no] preamble-short
Note This command is not supported on the 5-GHz access point radio interface (dot11radio1).
Syntax Description
This command has no arguments or keywords.
Defaults
The default is short radio preamble.
Command Modes
Configuration interface
Command History
Usage Guidelines
If short radio preambles are enabled, clients may request either short or long preambles and the access point formats packets accordingly. Otherwise, clients are told to use long preambles.
Examples
This example shows how to set the radio packet to use a short preamble.
AP(config-if)# preamble-short
Part of the frame that is transmitted by an 802.11 station is called the preamble. The original 802.11 specification (which defined only 1 and 2Mbps operation), defined only a long preamble that uses a 128 bit sync field. When the "high rate", i.e. 11Mbps, 802.11b standard was created, an optional short preamble using a 56 bit "sync" field was added. This was intended to improve the efficiency of the wireless network for more "real-time" applications such as streaming video and Voice-over-IP telephony applications. Figure 1 has the gory details on the two preambles if you're interested.

Figure 1: Short and long 802.11 preambles
From: 802.11 Wireless Networks: The Definitive Guide , used by permission [1]
All 802.11 devices in the 2.4 GHz band, including 802.11g devices, must be able to transmit and receive long preamble frames. 802.11g devices are required to be able to transmit and receive both long and short preambles, but support for short preamble in 802.11b devices is optional.The problem occurs when an 802.11g AP allows the use of Short Preamble by the stations it communicates with (also known as its BSS - Basic Service Set). The AP may also choose to allow legacy stations that do not support Short Preamble to associate with the BSS. If both these conditions are allowed, the legacy stations that aren't short-preamble-capable will not be able to understand much of the communication in the BSS, and most importantly won't be able to receive the all-important "Protection" frames. This could result in legacy 11b stations transmitting at the same time as 11g stations, which doesn't help either one to properly get their data sent!
This 802.11b interoperability problem has been noted in recent articles on draft-802.11g, but it looks as though it may be getting somewhat overstated. First, the short-preamble problem affects only a subset of the 802.11b products in the field. Specifically, ORiNOCO and Symbol cards and those using the Intersil PRISM 2.0 and Agere Systems chipsets.
Second, manufacturers may already have incorporated a fix for this problem into their AP code. (I've used both ORiNOCO and PRISM 2.0 based cards in my testing and have yet to run across the problem.) And finally, another reason to relax is that I'm told that the IEEE Task Group g committee will probably address this issue in the 802.11g standard after some additional debate.
broadcast-key
broadcast-key
All dot1x clients have a unique key but share a seperate broadcast key that is derived through the dot1x process. To rotate that key use this command on the radio interface.
Use the broadcast-key configuration interface command to configure the time interval between rotations of the broadcast encryption key used for clients. Use the no form of the command to disable broadcast key rotation.
[no] broadcast-key
[vlan vlan-id]
[change secs]
[ membership-termination ]
[ capability-change ]
[vlan vlan-id]
[change secs]
[ membership-termination ]
[ capability-change ]
Note Client devices using static WEP cannot use the access point when you enable broadcast key rotation. When you enable broadcast key rotation, only wireless client devices using 802.1x authentication (such as LEAP, EAP-TLS, or PEAP) can use the access point.
Note This command is not supported on bridges.
Syntax Description
Defaults
This command has no defaults.
Command Modes
Configuration interface
Command History
Examples
This example shows how to configure vlan10 to support broadcast key encryption with a 5-minute key rotation interval:
AP(config-if)# broadcast-key vlan 10 change 300
This example shows how to disable broadcast key rotation:
AP(config-if)# no broadcast-keycountermeasure tkip hold-time
countermeasure tkip hold-time
Use this to freeze out clients that perform an attack such as a bit-flip. To be applied per radio.
Use the countermeasure tkip hold-time configuration interface command to configure a TKIP MIC failure holdtime. If the access point detects two MIC failures within 60 seconds, it blocks all the TKIP clients on that interface for the holdtime period.
countermeasure tkip hold-time seconds
Syntax Description
seconds | Specifies the length of the TKIP holdtime in seconds (if the holdtime is 0, TKIP MIC failure hold is disabled) |
Defaults
TKIP holdtime is enabled by default, and the default holdtime is 60 seconds.
Command Modes
Configuration interface
Command History
Examples
This example shows how to configure the TKIP holdtime on the access point radio:
ap(config-if)# countermeasure tkip hold-time 120
dot11 holdoff-time
dot11 holdoff-time
This one threw me. You can use this with EAP and MAC auth to freeze out clients that fail to log in properly to prevent DoS.
Use the dot11 holdoff-time global configuration command to specify the hold-off time for EAP and MAC address authentication. The holdoff time is invoked when a client fails three login attempts or fails to respond to three authentication requests from the access point. Use the no form of the command to reset the parameter to defaults.
[no] dot11 holdoff-time seconds
Syntax Description
Defaults
The default holdoff time is 0 (disabled).
Command Modes
Global configuration
Command History
Examples
This example shows how to specify a 2-minute hold-off time:
AP(config)# dot11 holdoff-time 120
This example shows how reset the hold-off time to defaults:
AP(config)# dot11 no holdoff-time
Subscribe to:
Posts (Atom)